Nowadays, online retail is a big piece of the pie that most companies want to excel at. A recent report from the Chamber of Commerce said that, in comparison with the same period last year, there is currently an increase in eCommerce sales of 74.3%. And report from Statista says that ecommerce sales will grow to more than $1 trillion in 2022. Yeah, you read that correctly $1 TRILLION.
That sounds very attractive to businesses; however, in most cases, eCommerce development could cost you a fortune, especially if you want custom features and design.
Retailers that prefer to use existing websites are, in most cases, looking for solutions that will help save money and time. Below, you will find comprehensive information on how to add eCommerce to your website using modern technologies.
1. Integrate eCommerce into your existing site using plug-ins
If your business website was developed using such CMS as WordPress or Joomla, you can set up the number of eCommerce platforms for your site. You can configure the platform you choose and sell using your main website.
You might also like: The Reason Your Website Is Actually Preventing Sales
To use this tip, your website software should be up-to-date. Also, do not forget to add an eCommerce extension.
2. Tag on separate solutions to your business website for online sales
This is the best option if your business website software does not provide users with suitable extensions for online retail. You can develop a separate online shop with an authentic design like your initial website. Use this trick for a seamless user experience.
Having the same design, users will think that they are still on the same website, even though both sites are on different platforms. This is the best option to consider when adding eCommerce to a website, especially if your website cannot be updated or does not have an eCommerce extension.
3. Add eCommerce features to your existing website
If you are looking for the answer on how to add eCommerce to a website, we are here to help. You can add eCommerce features such as payment gateways and shopping carts – keeping in mind that payment gateways such as Paypal, Sage and Google Checkout are the best. Using this basic eCommerce feature, your customers can select products and make purchases on an external website.
4. Use the Shopify Buy Now Button
With this simple method, you can add basic eCommerce features to literally every website. Future online retailers can add this button on a:
- WordPress website
- Tumblr
- Squarespace
- Self-hosted website
- And more
It is not rocket science to add a Shopify Button to your website. Nevertheless, it gives you a huge amount of advantages, including reliability on the Shopify platform for just £9 per month.
How does it work?
Let’s see an example. To set up eCommerce on your site, WordPress blog owners should log into Shopify. Then, add necessary products and generate a buy button.
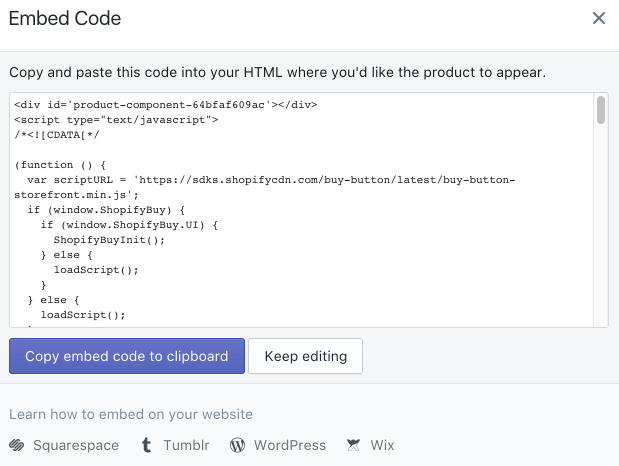
The next step is to paste the embed code into the website sidebar on any page, or on a post.
Here’s an example of the embed code.
<--script data-shopify-buy-ui>
var scriptURL = "https://cndurl.com/buy-button-storefront.js";
if (window.ShopifyBuy && window.ShopifyBuy.UI) {
ShopifyBuyInit();
} else {
var script = document.createElement('script');
script.async = true;
script.src = scriptURL;
(document.getElementsByTagName('head')[0] || document.getElementsByTagName('body')[0]).appendChild(script);
script.onload = ShopifyBuyInit;
}

function ShopifyBuyInit() {
var client = ShopifyBuy.buildClient({
apiKey: 'your-api-key',
domain: 'your-store.myshopify.com',
appId: '6'
});

ShopifyBuy.UI.onReady(client).then(function (ui) {
ui.createComponent('product', {
id: 12345,
options: {
product: {
buttonDestination: 'cart',
contents: {
description: true
},
text: {
button: 'Add to Cart'
},
styles: {
button: {
'background-color': 'blue'
}
}
},
cart: {
styles: {
button: {
'background-color': 'orange'
}
}
}
}
});
});
}
<--/script>
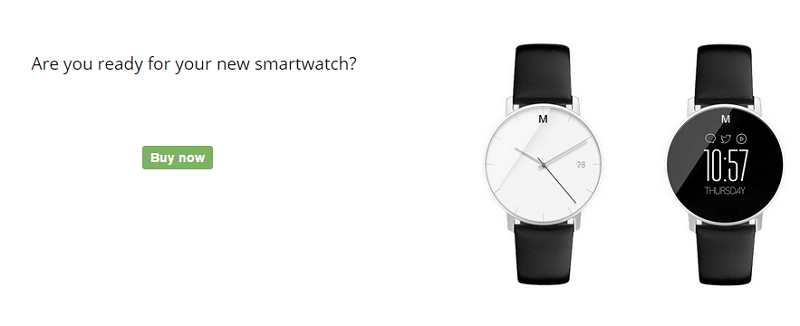
If you do everything right, the buy button will look like this:
<–script data-shopify-buy-ui>
var scriptURL = “https://cndurl.com/buy-button-storefront.js”;
if (window.ShopifyBuy && window.ShopifyBuy.UI) {
ShopifyBuyInit();
} else {
var script = document.createElement(‘script’);
script.async = true;
script.src = scriptURL;
(document.getElementsByTagName(‘head’)[0] || document.getElementsByTagName(‘body’)[0]).appendChild(script);
script.onload = ShopifyBuyInit;
}
function ShopifyBuyInit() {
var client = ShopifyBuy.buildClient({
apiKey: ‘your-api-key’,
domain: ‘your-store.myshopify.com’,
appId: ‘6’
});
ShopifyBuy.UI.onReady(client).then(function (ui) {
ui.createComponent(‘product’, {
id: 12345,
options: {
product: {
buttonDestination: ‘cart’,
contents: {
description: true
},
text: {
button: ‘Add to Cart’
},
styles: {
button: {
‘background-color’: ‘blue’
}
}
},
cart: {
styles: {
button: {
‘background-color’: ‘orange’
}
}
}
}
});
});
}
Moreover, you can customize the design of the button to match your website and branding. The button is responsive and will gooks great on all devices:
- Smartphones
- Tablets
- Computers
If you plan to sell more than one item, adding an embedded shopping cart is a great idea. This feature allows customers to buy several products or return to checkout.
5. Set up Facebook eCommerce
If your company prefers to use social networks for business, you will find this article very useful. Nowadays, social networks are extremely popular and effective channels for advertising. From this point of view, you can turn them into effective sale channels.
The first thing you should do is to create a Facebook Business page for your company. Then, find an Add a Shop Section button on your timeline.
You can see it under the cover photo, to the right. Then, you will see a popup. You should fill it in with your business details.
Do not ignore the box requesting your e-mail for custom service inquiries. This will help your company receive questions from your future or existing customers.
When it comes to payment, you have two options. You can accept payment via your Facebook page or redirect shoppers to another website for checkout.
Need Help Installing E-commerce Features On Your Website? Let’s Talk!